Tuesday, December 29, 2015

Altered Book Calendar

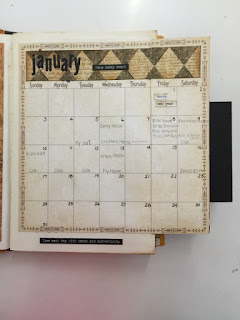
Hello, it’s Angela and this month’s designer challenge was to design a unique calendar that gets 2016 off to a creative start. What’s on trend right now are planners and I wanted create a project with this in mind. I purchased a children’s encyclopedia from 1963 containing about 80 pages. Old books are quite sturdy and the pages are already distressed so this made a perfect base for my book that was going to become my personal planner for 2016. I used my favorite paper collection of all time and my favorite tag dies and made a planner that is perfect for me. Let me share with you how it was created.


Cover:
*Measure the cover of the book, cut the design paper and glue to the front and back of the book
*Cut the spine design paper the length of the cover and 3” wide and glue onto the spine of the book
*Die cut frames from black cardstock glue to cover to highlight certain graphic of the design paper
*Add the metal “pull” handle

 
Inside Cover of Book:
*Measure the length and width of the inside cover, cut design paper and glue inside over existing paper
 
Create top slide pocket and tag:

*Glue page 1 and page 2 of the book together on the bottom and right side to create a top pocket
*Die cut a black tag from 12” x 4.5”cardstock, cut down to fit into pocket at desired length
*Add ribbon, phone brad, lined paper, design paper to tag and stamp with January

*Cut design paper to 11” x 8.5”, score at 5.5”, fold and glue to the front of back of the pocket page
*Decorate page with design paper, photos, tags and phrases
*Write on tag birthdays, anniversaries, etc for the month
 
Create Side Pocket Page and Tag:
*Glue page 3 and 4 at the top and bottom of the pages to create a side pocket
*Score 8x8 calendar page between Thursday and Friday, glue to page 3
*Cut a piece of design paper 7.25” x 1.25” and cover the word January on the 8x8 page
*Die cut “JANUARY” in black from the alphabet die and glue to the design paper on the calendar

*Cut design paper 8” x 2.25” and place on the fold of the 8x8 calendar flap
*Mat the January 3 x 4 preprinted calendar on black and add to the flap

 
Create the Side Pocket Pull Out:
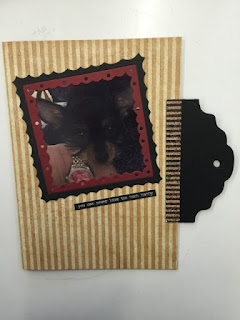
*Cut design paper 8” x 11.5” and score at 5.75” and fold to create a “folder”

*Die cut two tags tops from black cardstock at the same time (mirror images)
*Glue to the edge of the folder on the open side
*Cut 2 pieces of design paper 4.25” X 1/2” and glue to the bottom of the tags

*On front of folder, cut 1 black and 1 red cardstock frame that nest and frame a photo and glue

*Place folder in pocket
*Decorate back of page with design paper 8.25” x 5.75”
 
*Repeat above for February through December calendar pages
 
1062 Fitted Frames 2 Lace
960 Tags & More 7 Vine
961 Tags 7 More 8 Lattice
1075 Alphabet lower case
 
Other Products Used:
Old book
Graphic 45 Communique Collection Pack 2009
Graphic 45 Time to Flourish Calendar Pad
Graphic 45 Time to Flourish month stamps
Carta Bella Christmas Wonderland Naughty/Nice 12 x 12 sheet
Spare Parts telephone brads
Tim Holtz Idea-ology small talk phrases
7-Gypsy metal door pull
Custom Calendar page 12 x 12
Black and red cardstock
Black and red crepe ribbon
Scrapbook Adhesives photo corners
Ranger Archival Ink in Coffee
Sponge for inking
 

Sunday, November 29, 2015

Repurposed Frame


Altered Home Décor Picture Frame
Hi, it’s Angela & I am sharing my designer project for this month. Our challenge was to create a project using white, gold or silver. This was a tough project for me and I finally settled on altering an existing home décor item that I purchased on clearance from Hobby Lobby. I was inspired by a favorite black & white photo of my daughter & myself that was taken at an event in my store. The photo brings back fond memories and the fun we had during that day! Let me share with you how I created this project.
 

*Altering an home décor item is easy with a little spray paint
*Spray the metal parts of the décor piece with white paint
 

*Allow piece to air dry
*with sponge apply Mushroom alcohol ink to create a vintage look to the metal
 

*Cut shimmer sheetz into 3/4” strips and emboss from both ends thru the Big Shot machine
*Lightly sand the shimmer sheetz and apply Mushroom ink with the sponge to achieve a vintage look
 
*Miter both ends of the shimmer sheetz and place at the top of the frame with ECD tape
*Repeat with the bottom and both sides of the frame
*Crop the photo to the size and place on top of the rectangle and tape in place, lightly ink the edges

 
I am happy with how this project turned out. The embossed shimmer sheetz look similar to old tin ceiling tiles and I love the vintage look. Each time I see this project, I will smile at the memory of that photo. I hope this project inspires you to alter an expensive item and turn it into something completely different!
 
Silver Shimmer Sheetz
KB 102 Trendy Tiles Embossing Folder
ECD Tape
 
Other Supplies:
White spray paint
Mushroom Distress Ink
Sponge and handle
Home Décor Item
 

Thursday, October 29, 2015

Sled with Elizabeth Craft Designs

Hi, it’s Angela and today I want to share my ECD challenge project. I decorated a 12” wooden sled that is perfect to hang on your door for the holiday season. I also created a coordinating gift tag which could makes this a perfect house warming gift! I love using my dies, scrapbook paper and craft supplies to create home décor. Take a look at how easy this project came together.

Elizabeth Craft Designs Products:
Other Supplies:
Red wooden sled
cardstock- olive
crème seam binding ribbon
red crepe ribbon
2 gold jingle bells
Kaisercraft Christmas paper
jute to hang sled
Thanks for joining me!  Merry Christmas!

Tuesday, September 29, 2015

Album Cover with Elizabeth Craft Desins

Hi, it’s Angela and today, I want to share a fun and easy way to decorate an album using a brand new die from Elizabeth Craft Designs. I love quilts and this die is a perfect way to create a faux quilted look to the front of a simple chipboard album. Let me share with you how I created these darling mini quilts using one die and an 8x8 paper pad!


Assembly:
*Begin die cutting the Fitted Frames 4 die in multiple patterns and colors from the paper pad
*Choose the number of frames that will fit the surface you are covering
*Begin assembling the frames and adjusting the pieces until the placement of colors is coordinated to what you want


*glue each section onto a scrap square of cardstock and assemble each one


*place each quilt block into the embossing folder and emboss in the Big Shot
*after embossing, use distress ink & sponge each quilt square
 
 
*add four small brads into the corners of each block
*using a liquid glue, glue each panel to the front of the chipboard album
 
 
Your faux quilted album front is finished! This is an easy project that works with any paper collection and it would also be beautiful as a card front. I hope you give this project a try!
1064 Fitted Frames 4 Curvy Square
E121 Bouquet Embossing Folder
 
Other Products used:
Maya Road chipboard album
8x8 paper pad World’s Fair Graphic 45
4 brads
Big Shot
Distress ink and sponge
assorted scraps of cardstock
PVA glue

Sunday, August 30, 2015

Boys & Toys Scrapbook Page with ECD!

Hi, it’s Angela and today I want to share with you a fun & easy scrapbook page that can be created with the tag die from Elizabeth Craft Designs. My friend Nicole created this super cute boy layout. It has a waterfall of tags with pictures of her son Caden enjoying his ATV. Let me share with you how she created this great page!


Waterfall:
 
*Die cut out the number of tags for the waterfall, all tags need to be the same length, then score at 1/2” on straight edge
*Apply 6 mm ECD double sided tape to each scored edge and remove the liner and apply the first tag on the page and then line up the next one under the first butting the scored edges next to one another to create a waterfall effect on the page front.
*Continue to add tags the length you want, then the last one can be used as a visible photo mat or to show patterned paper as Nicole did.

*As a finishing touch, die cut hexagon cut from shimmer sheetz were added to the holes in the tags
 
Embellishing the page:

 
*Die cut from the new ribbon & jewels die, a metallic element was added at the bottom of the page that looks like a chain


*Using the metallic shimmer sheetz, gears were die cut and added to the page
*Take a toy car and “drive” it through an ink pad to create the tire tracks on the page


*A metallic clip was also die cut and added to the top of the waterfall


*a wooden “boys & toys” was added to the page
 

For fun, I am adding a photo of what the table looks like when Nicole, Darcy & I get together to create! We have dies, shimmer sheetz, glitter, paper, Big Shots and adhesive everywhere! Call your friends, invite them over and create something together. Scrapbooking is a great way to enjoy  spending time with your friends. And I am always the most creative when I am around creative friends! I hope you give this technique a try!
 
 
917 Clock & Gears
961 Tags & More 8 Lattice
958 Tags & More 5 Sunburst
1070 Ribbon & Jewels----coming soon
1075 Alpha 2 lower case
 
Other Supplies:
Adorn-it paper and wooden embellishment
grey cardstock
black ink pad
toy car
 

Saturday, August 29, 2015

Halloween Fun With Elizabeth Craft Designs

Hi, it’s Angela and I am so excited to share this project with you. My friend Nicole created a festive Halloween project featuring pull out tags. Let me share with how she created the project using Elizabeth Craft Designs dies, peel-off stickers and glitter.
photo a
*A piece of cardstock 17 1/4 x 11 1/2  was scored to create four panels, pockets & a flap

*Inside view of the book with the tags in the pockets

*Four pieces of pattern paper were cut to decorate the back of the book
*Letter & numbers were die cut from black cardstock to create the front title of the book “October 31st” and it was glued on the front cover
*A pumpkin peel-off was placed on double sided adhesive, glittered with diamond glitter, burnished, then colored with copic markers and the cut out
*A magnet was placed between the pumpkin and black cardstock circle to create a magnetic closure for the book front

*Panel # 1 has a pattern paper tag that has been scored twice and it creates a pull down tag which was decorated with a stamp image and metal skeleton

*The tag has a journal spot and pictures placed
*Panel # 2  and panel # 3 have tags folded once and google eyes and photos were used to decorate the tags

*Inside the book was decorated with patterned paper behind the pockets and on panel #4, a patterned tag was placed on the pocket front

*Four back cardstock tags were die cut from assorted tag dies
*The cardstock tags for the pockets were decorated with photos of the kids in costumes and ECD double sided tape was applied to the tags and then  ECD silk micro fine glitter was applied and burnished in

*On the other two tags, glitter was applied and ribbon was placed on all tags

*The names of each child were die cut and glued to the tag back along with photos

*The positive and negative images from the alphabet dies were used to create “Brody’s” name and a gold metallic marker was used to write “My boys 2013”
Nicole did a wonderful job on this cute tag book! Creating one is easy and fun to decorate and embellish. Pull out your photos, dies & glitter and make a tag book keepsake for yourself!
Elizabeth Craft Designs Products:
958 Tags & More Sunburst die
959 Tags & More Daisy die
957 Tags & More Flourish dies
967 Alpha 1 die
1075 Alpha 2 lower case
1076 Numbers & More 2
2538 Pumpkin peel-off
641 Cool diamond silk microfine glitter
624 Bluebell glitter
614 True red glitter
613 Orange glitter
612 Saffron glitter
631 Soft green glitter
601 Basic black glitter
Other products used:
My Minds Eye Frightful paper
Manilla cardstock 17.25 x 11.5
black and orange cardstock
black cardstock
magnets
copic markers
brads
skeleton charm
wicked stamp
ribbon
gold metallic pen

Monday, June 29, 2015

Retirement Gift Bag & Tag


Hi, today I want to share with you a gift bag that I created using the fun peel-off stickers from Elizabeth Crafts Designs and just a few other supplies! Let me share with you how I created this project.


The Bag:
 
*The gift bag was created using two sheets of 12 x 12 patterned paper.
*Choose a piece of beach themed paper for the bag front and mat on black cardstock. Adhere to the bag front.


Decorating the Bag:
 
*Die cut a black palm tree from the palm tree die.
*Apply the sunglass peel-off to a scrap of silver shimmer sheetz, and cut the glasses out.
*Adhere the sunglasses, the palm tree, the ship and the “congratulations” peel-off to the bag front.
*Punch two holes with the crop-a-dile and set eyelets and place jute cord through the holes for a handle, repeat for the back of the bag.


The Gift Tag:
 
*Die cut a tag from the Tags & More 3 die from kraft cardstock.
*From the beach pattern paper, die cut the beach edge of palm trees.
*Apply the flip flop peel-off to a piece of pink cardstock and cut out.
*Add the beach edge die cut to the tag front, add the flip flops and a “Happy Retirement” peel-off to complete the tag front.
*Set an eyelet with the crop-a-dile and tie with jute and pop dot the tag onto the front of the bag.


Add some coordinating tissue paper and voila’ your bag is finished. With the diversity of the peel-offs, you can create a gift bag for any occasion! I hope you try this fun and easy way to create with peel-offs!
 
Supplies:
 
Elizabeth Craft Designs
Peel-offs:
 
Shimmer Sheetz:
Dies:
 
Other:
cardstock- black, pink and kraft
Authentique Beauty Collection paper
Kaiser Sandy Toes Collection paper
Crop-a-dile
3 eyelets
jute string